background

Saturday, October 25, 2014

Zombie Themed Party


With the recent start of the new season of Walking Dead, we decided to throw a premier party with some friends. I put together a fun spread of zombie themed finger foods and we asked our guests to dress as one of the characters from the series. It turned out great and the premier was a thriller!


Here are a few fun ideas if you need have a Halloween party or office potluck coming up this week. Hope you enjoy!


Moldy Cheeseball


This is a fast way to add a little Halloween flair. Make your favorite cheeseball recipe, or even pick up one from the store. Roll it in green herbs to give it a moldy look. I used parsley flakes so the flavor would not distract from the flavor of the cheese. Serve with crackers or veggie sticks and decorate the plate with plastic spiders or insects to add to the effect.

Cured Epidermis


Create an eerie display with these cured pieces of proscuitto. I found this idea from Martha Stewart. The result is a jerky-like meat with a great salty flavor. 

Preheat your oven to 400 degrees. Lay slices of proscuitto - mine were about 1/4 inch thick - in a single layer on a foil lined baking sheet. Bake for 15-20 minutes until stiff and crispy, turning over once.

Line another baking sheet with paper towels. Set wire cooling rack over paper towels. Remove slices from oven and transfer to cooling rack to drain grease.

Serve on a tray or plate with a butcher knife for extra spooky effect.

Bloodshot Eyeballs


This is a simple option for a creepy party food. Prepare deviled eggs as you normally would. Use a slice of green olives with pimento for the pupils. Dip a toothpick in red food coloring and draw lines to create bloodshot veins.

Intestine Sausages


Warm cocktail sausages on low heat in a crockpot. Serve with a side of BBQ sauce or spicy mustard.

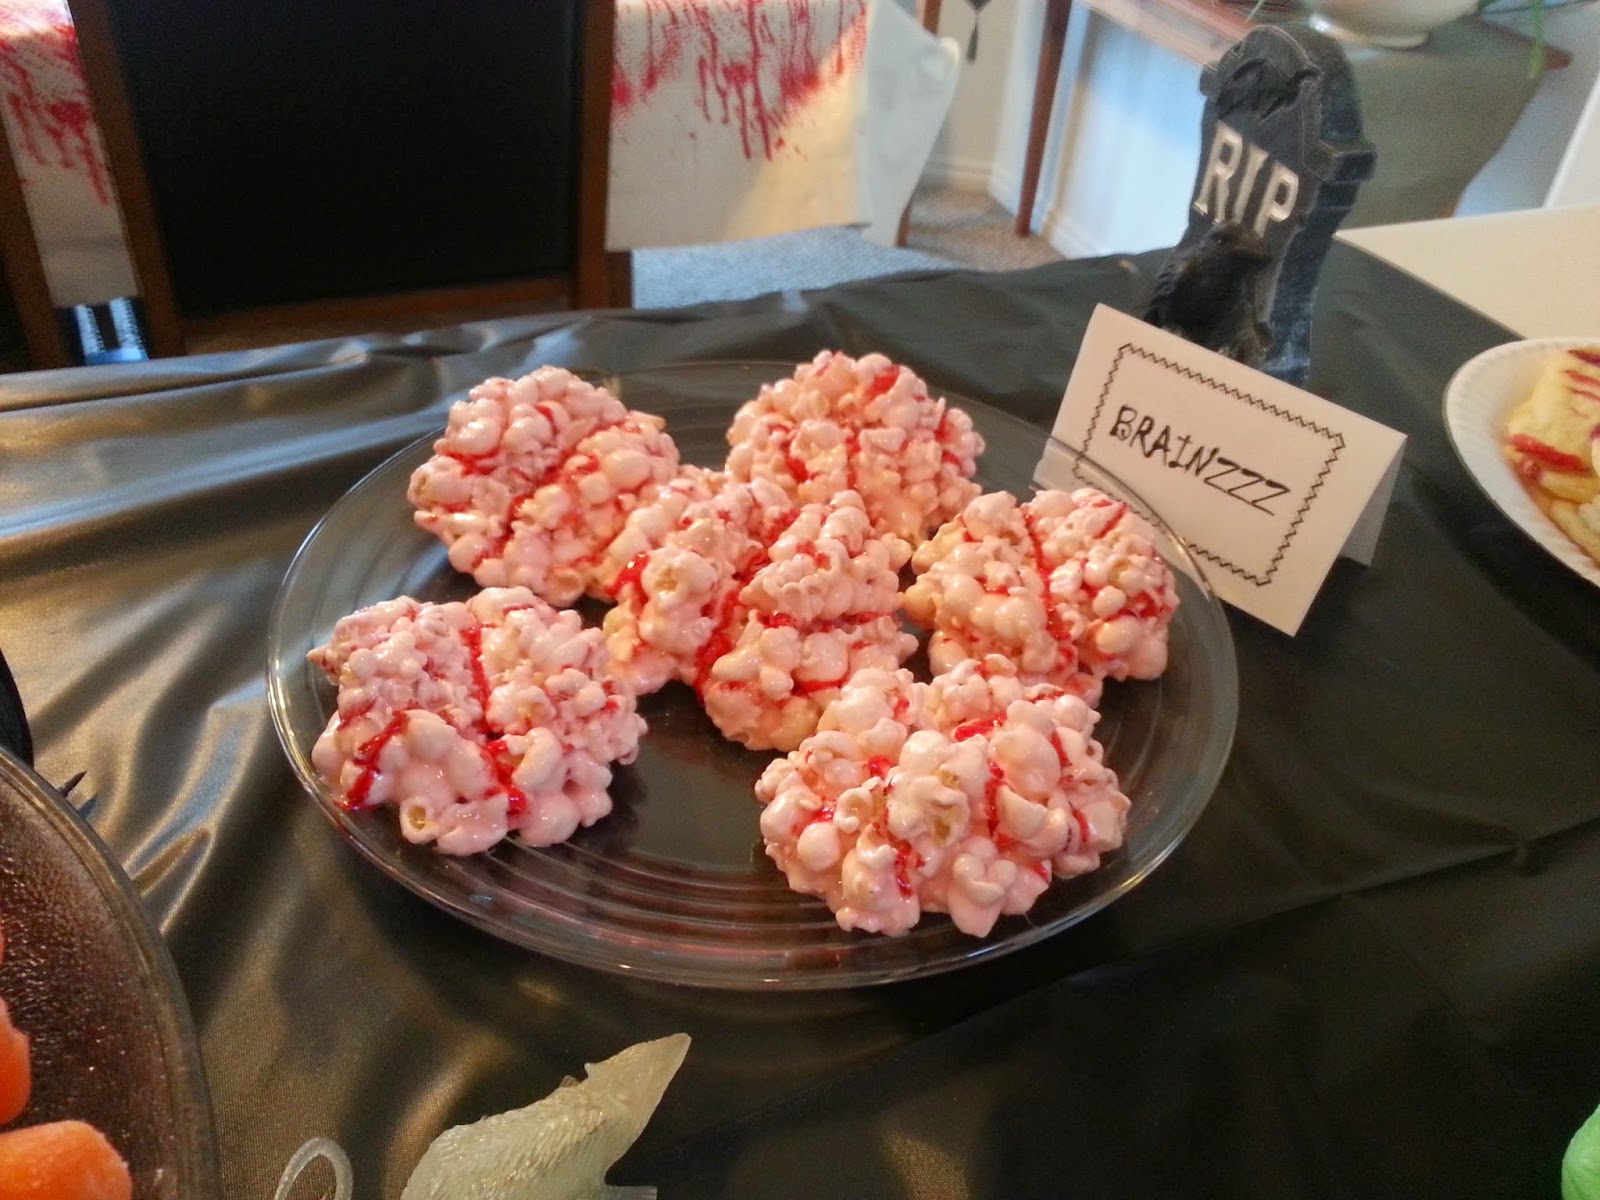
Zombie Brain Popcorn Balls


This is a recipe I posted last year. These are so fun and always impress. You can find the recipe and instructions here.

Zombie Fingers


These are yummy shortbread cookies made to look like zombie fingers. By adding a couple drops of green food coloring to your cookie dough, you could make witch's fingers instead. I adapted my recipe from one I found on Food.com

Ingredients:
1 large egg + 1 egg white
1/4 teaspoon vanilla
1/4  cup butter, at room temperature
1/4 cup powdered sugar
2-1/2 Tablespoons granulated sugar
pinch of salt
3/4 cup flour
18-20 pecan pieces or blanched almonds
red food coloring
green food coloring

Directions:
Preheat your oven to 350 degrees. Spray a large baking sheet with non-stick spray. In small bowl, whisk together 1 whole egg and vanilla. Set aside. 

In large mixing bowl, combine butter, powdered sugar, granulated sugar and salt. Mix with hand mixer (or paddle attachment of electric mixer) on medium speed until well combined. Add egg/vanilla mixture and beat until smooth, about 2 minutes. Add the flour and mix on low speed until just incorporated. Wrap the dough in plastic and chill for 20-30 minutes, until firm.

Working with rounded tablespoons of dough, roll each piece on a floured surface into a finger shape, 3-4 inched long. The dough will expand when cooked, so make your fingers skinnier than you want them to be. Pinch the dough in 2 places to form knuckles. Make them large and uneven for a creepier look. Score each knuckle lightly 3 times with a small knife. Place on prepared baking sheet, allowing room for expansion between fingers. Repeat process until all dough is used. Should make 18-20 cookies. 

In small bowl, beat 1 egg white with 2 drops of green food coloring. Lightly brush all cookies with egg white mixture. Press pecans onto end of each finger to form finger nails. Using a small paint brush dipped in red food coloring, brush around the "cuticle" of each nail to create a bloody effect.

Bake until lightly browned and firm - about 12 minutes. Allow to cool completely before serving.

Eyeball Juice


I found some plastic eyeballs at a Halloween store. After running them through the dishwasher, I added them to grape flavored Crystal Light to create a spooky looking punch. 


These were all fast and easy recipes, but the result was a fantastic looking spread of creepy food. Putting it all together was so fun and I hope something here has sparked an idea for you and your upcoming Halloween events!

Saturday, October 26, 2013

Lemon Bars

I am lucky enough to work for an extraordinary boss and company, so with Bosses Day hitting last week I wanted to make sure I acknowledged by boss with a treat that I know she likes. I had never made lemon bars before, but after looking around for some tips and recipe reviews, I tailored this to be what I think is the perfect ratio of sweetness, tart lemon flavor and buttery crust.

As a note, I only used a small amount of powdered sugar on the top. While I love the touch of powdered sugar, when eating treats topped with the stuff I somehow always manage to inhale or exhale at exactly the wrong moment and end up covering myself with sugar or choking on it. So, for the sake of keeping these low maintenance to eat I kept the sugar minimal. You could obviously adjust this to match your personal taste.

Lemon Bars

Crust
1 c butter, softened
2 c flour
1/2 c sugar
pinch of salt

Filling
3 c sugar
1/2 c + 2 T flour
1 1/4 c fresh lemon juice (approx 5-6 large lemons or 7-8 small lemons)
zest from 2 lemons
8 eggs

powdered sugar to top (optional)

Preheat oven to 350 degrees. Use pastry cutter or just your hands to blend together all crust ingredients in medium bowl. Press into greased 9x13 pan. Bake for 20 minutes. Set aside to cool slightly while preparing the filling.

Whisk filling ingredients together in medium bowl until well combined. Pour over crust. Bake for an additional 30 minutes. Allow to cool in pan.

Sprinkle with powdered sugar to taste while still slightly warm. Once cool, cut into squares and serve.


Tuesday, October 15, 2013

Zombie Brain Popcorn Balls

We are somewhat infatuated with zombies at our house. So with the recent season of The Walking Dead starting, some friends invited us over to watch the premier. It only felt right to bring a zombie-related treat. These popcorn brains were fairly easy to make (just a little messy) and they turned out pretty fun. This would be a great option to take to any Halloween party or potluck with relatively low cost and low time commitment.


Popcorn Brains
6 cups popcorn, popped and lightly salted
1 bag (10 oz) mini-marshmallows
3 T butter
1/4 t vanilla
red food coloring
small paintbrush

In large saucepan, melt the butter and marshmallows over med-low heat, stirring regularly. This process may take 5-10 minutes, but if you rush the marshmallow melting, your popcorn balls will turn out hard. Once melted, add vanilla and 2 drops of food coloring and stir until color is distributed. Stir in popcorn until evenly coated.

Form popcorn into tennis ball sized balls. This is the part that can be kind of messy. I attempted to do this with my hands using some butter to grease my fingers, but the mixture was way too sticky and would not bind together but rather just stuck to my fingers. My solution was to take a square of wax paper, spray it with non-stick spray, spoon the popcorn into the center and use the wax paper to form around the popcorn ball. Then I carefully peeled back the wax paper to release the popcorn ball.

You will want to form these into a somewhat flattened ball so they more resemble a brain shape. After forming a ball in the wax paper, I squished the ball slightly and pressed down along the center to create a minor valley between the brain hemispheres. This is the line where you will later paint your major dividing vein. Set the finished brains aside on another clean piece of wax paper to cool.

After forming all the brains, use a paint brush and food coloring to paint the major vein down the middle of the brain and then as many side veins as you want for effect. Mmmmm....BRAINNNZZZZ!


Wednesday, May 8, 2013

Homemade Sugar Scrub


Have you ever used a sugar scrub? It just sounds lavish (and fattening). But it really is a little something extra that makes you feel good. Every time I use one, I vow that I will make it a regular part of my routine. Now that I know how simple it is to make your own, with ingredients already on hand, there really is no excuse.

I made this as a Mother's Day gift for our moms as well as the step-daughters. This would also be an easy and fun gift for any occasion; baby showers, bridal showers, birthdays, etc. You can easily change up the scent to make it more seasonal as well. I used orange since we already had a bottle. 

I bought my jars at Walmart and then used Mod Podge to apply scrapbook paper and labels to the front and top. Make sure you go slightly beyond the edges of the paper so you get better adherence to the glass. I finished it off with some twine and a cute button just for presentation, but this would be easy to customize to whatever your taste or occasion.

Homemade Sugar Scrub
3 cups white sugar
1 cup olive oil (you could also use almond oil)
20-30 drops essential oil (for fragrance)
Glass jars with lids


In medium mixing bowl, mix sugar and olive oil until evenly moistened. Add drops of essential oil to create desired fragrance. Spoon into jars. My jars were 10 ounces each and this recipe filled 3 jars. 


Cute, easy gift idea for any deserving women in your life. Or great to just make for yourself to have on hand. This is a great exfoliator to use on hands and feet as we go into summer. Perfect to help get your skin ready and glowing for the season.

Tuesday, April 30, 2013

Sandal Season


So the weather this weekend was beautiful! We spent a lot of time outside working in the yard, bathing the dogs and enjoying the sun. Besides being a great reminder that I had vowed to be in perfect shorts-friendly shape by this time (whoops!) it is also the beginning of sandal season! 


Ladies, one of the great things about being a woman is the opportunity to enjoy pretty things and celebrate our femininity. No, I'm not saying you HAVE to be all dolled up in order to be considered a successful woman. I am not making a statement on feminism or equality here. I am simply saying that it is totally appropriate to celebrate what it means to be a woman. With fun, sassy sandals from flip flops to espadrilles to heels, you can make a great fashion statement. However, if you plan on busting out those toes, let's take a moment to prepare. A cute shoe is completely trumped and defeated by gnarly toes, chipped polish and cracking heels. If your heels look like a pumice stone, it doesn't matter how cute your shoes are. That is all that will be drawing people's eyes. It's like a train wreck...you want to look away, but you just can't.  Your feet have been hiding inside thick socks and tall boots for months. Here are a few basic tips to helping them make an impressive debut:

  • Exfoliate! Use a foot scrub to help remove dry skin. (Here is an easy homemade sugar scrub that works great.) These exfoliator creams can be used on legs and hands as well for extra soft skin. Use a pumice stone or foot file to work over rough or callused spots like the heel and ball of the foot. 
  • Moisturize! Your feet need moisture to help keep them looking and feeling fresh. The best time to do this is right before bed so you get the advantage of the moisturizers working while you are sleeping. I recommend using a cream or shea butter rather than a lotion. These options are much more concentrated to help keep your natural body moisture in rather than just evaporating like a thin lotion will. One I have found that I like is Cetaphil. You can buy this by the tub as Costco which makes it cost effective. It is a great moisturizer for your whole body.
  • Groom! Keeping your toenails shaped is important. After showering (so the nails are softer) trim nails straight across the toe, then snip corners at a 45 degree angle. Nails should not extend past the toe itself. Use a file to round the sharp corners slightly to avoid ingrown toenails.
  • Express Yourself! Pick a color that is fun and bright. Use a base coat prior to applying the polish in order to avoid yellowing your nail beds. If you do find your nail beds a bit discolored, try rubbing them with a lemon wedge for a minute. The lemon juice is said to contain oxidizing agents that can help brighten your nails.

And finally...let go of your beliefs that your feet are weird. All feet are weird. If you are taking care of yourself and putting just a little effort into presenting them at their best, you can wear those strappy sandals with pride. As a teenager I was embarrassed of my short toes. I remember going to Lake Powell with my high school friends and actually being self conscious about people seeing my feet. I would cover them with a towel on the boat. Now I love that they give me an opportunity to express some fun and color. Your feet take you everywhere. They have put in thousands of miles for you. Treat them right and then show them off!


photo credit: pumpkincat210 via photopin cc

Saturday, April 20, 2013

Easter Brunch


Every Easter we host a dinner with lamb roast and homemade mint jelly. We didn't want to miss the opportunity to have the family over, but this year we wanted to try something different so we opted for a brunch instead. I made 2 frittatas, a beautiful fruit salad, some virgin mimosas and oven-cooked bacon (because everything is better with bacon).
All of these recipes were easy to put together and perfect for feeding a larger group. We kept it fairly Primal (grain & sugar free), but for those of you still loving your bread, this recipe for Stuffed French Toast would be a great addition as well.
Click below for each of the recipes.


Cooking Bacon in the Oven


Who doesn't love bacon? It is definitely a crowd pleaser, but can be tough to prepare in larger quantities. Last Christmas I tried preparing it in the oven and it worked beautifully, so I went with that method again for Easter. It is a lot less maintenance to prepare and much easier to make for a large group. Plus, when you are done, you can just discard the foil & grease. Easy clean up.

Oven-Cooked Bacon


Preheat oven to 400 degrees. Line baking sheets with foil and turn up edges slightly to help keep grease inside the pan. Lay bacon out flat on foil, not touching. Bake on middle rack for 18-25 minutes. Time will vary based on how thick your bacon is and how close together the pieces are. Just keep an eye on it. When it looks "done", it is. Remove from oven and let sit for 5 minutes. Transfer to paper towel to drain. Serve.

Non-alcoholic "Mimosas"


Simple way to liven up your orange juice for a party or gathering. Add berries for extra color and serve in champagne flutes.

Virgin "Mimosas"


2 (2-liter) bottles of Sprite Zero
1 gallon orange juice
2 cups pineapple juice
berries for garnish (optional)

Combine all ingredients in drink server or punch bowl. This was a fun way to have a special drink without too much fuss or extra sugar. If you make the Honey-Poppy Seed Fruit Salad, just use the pineapple juice you saved from draining the cans. We put blackberries, raspberries and sliced strawberries in this for color.
Serves 20

Honey Poppy-Seed Fruit Salad


This delicious fruit salad makes for a beautiful presentation. Throw this together right before your next gathering. The colors and flavors are a great addition to any tablescape.

Honey-Drizzled Fruit Salad


2 (20 oz) cans pineapple chunks in real juice
7-8 ripe kiwi, peeled, sliced and cut in half (to make half-circles)
3 cans mandarin oranges, drained well
3 cups strawberries, quartered
Approx. 3-4 T raw natural honey
poppy seeds

Drain pineapple chunks well (reserve the juice if you are planning on making "Mimosas"). Combine all fruit in large bowl. Lightly drizzle honey over fruit and stir to evenly coat. Sprinkle with poppy seeds as desired and stir again.
This salad stays beautiful for a couple hours, but then starts to "blend" colors. Best to make and serve immediately.
Serves 12-15

Easy Frittata


This is an easy recipe and perfect for customizing to whatever your tastes are as far as ingredients. Use this same basic recipe but try it with ham, bacon, cheddar, mozzarella, broccoli, peppers, etc. Simple and fast way to feed a larger group.

Sausage, Spinach & Pepperjack Frittata


1 lb spicy ground sausage
1 medium onion, chopped
1 1/2 cups shredded pepperjack cheese
1 pkg (16 oz) frozen chopped spinach, thawed and excess water squeezed out
14 eggs
1/2 cup milk
salt & pepper

Preheat oven to 400 degrees. Grease a 9x13 pyrex baking dish.
In a skillet over medium heat, cook the onion and sausage until meat is no longer pink. Remove from heat and stir in the drained spinach.
Spread 1 cup of cheese in the bottom of baking dish. Layer meat mixture over the cheese. In large bowl, scramble eggs and milk. Season eggs with salt and pepper. Pour eggs over meat mixture and cheese. Do not mix or stir contents of baking dish. Sprinkle remaining cheese on top.
Bake uncovered for 30 minutes, or until eggs are no longer runny and top is lightly browned. Cut into squares.

For variety, just change your layers using any type of meat, cheese and veggies that you want. I also made a ham and cheddar frittata using diced ham and sharp cheddar cheese.
Serves 12

Saturday, April 13, 2013

Planting a Vegetable Garden


I am excited to plant a garden this year. Last year we waited too long and missed the planting window. But we did dump a few bags of planting soil over the spot we wanted to use, which made it much easier to prepare the ground when the time came around again. For some reason the soil in our area is hard clay. After it bakes throughout the summer, it is almost impossible to work with, so I got out there early this time and prepared a spot for a small garden. I used some wooden sign stakes to plot out the boundaries and bought some basic garden fencing to wrap around the stakes. Inexpensive and easy to do. Looking at the area now, we may decide to expand it. It just looks so tiny! And since we haven't laid the sod down yet, it is easy right now to expand this area where there is no grass.


There is something so fun and rewarding about planting a vegetable garden. It is amazing to watch as your plants literally change and progress every day. It also gives you a sense of accomplishment, a chance to work outside in the sun, and of course, the nutritious food for a fraction of what you would spend at the grocery store for fresh produce. 

I think we are planting our salsa ingredients this year (tomatoes, onions, cilantro, jalapeños), I would also like to try some squash, carrots and maybe cucumbers. In looking for some tips on when to plant, I found this site. It lays out a basic schedule specific to the Wasatch Front. I thought I would pass it on in case you are planning your garden too.

Here are some tips I found as I was doing my research:
  1. Position your garden in a spot that gets at least 6 hours of direct sun each day
  2. Start planting early in the spring and plant in multiple phases so you have vegetables to harvest throughout the season
  3. Soak your seeds in room temperature water a few hours before planting them to start the germination process
  4. Use compost in your soil for a better result and higher quality product
  5. Make sure to give your plants plenty of water - they are not very drought tolerant
  6. Keep your garden free of weeds. Those little freeloaders want to soak up the nutrients and can harm your plants

So, what will you be planting this year? Do you have any tips to get better results?

Saturday, April 6, 2013

30 Days of Primal


Let me introduce you to Grok. He is my Caveman companion. On this blog I make reference to eating Primally and realize that some people may not know what that means. The Primal Blueprint is a fantastic book by Mark Sisson about how to retrain your body to function like the strong, healthy, amazing machine that it is. I highly recommend reading this if you have not already. The cliffs notes version of the plan is this: while our civilization and food have changed dramatically over the last 10,000 years, our genes have not. So, essentially out bodies are not able to process a lot of the food we eat day to day, including grains and processed sugars. By returning to a hunter-gather lifestyle, like my friend the Caveman, we experience countless health benefits including weight loss, energy balance, and immune strength.

I won't go into all the science here. If you have an interest in learning more about this, I recommend you visit Mark Sisson's blog at www.marksdailyapple.com. It is a fountain of information and success stories. What I do want to share here is my experience. About 2 years ago, we decided to become Primal. This meant giving up all grains and processed sugars and focusing our diet on meat, veggies, fruits, nuts and seeds, and occasional dairy. If you can kill it or find it, you can eat it. No more pasta, rice, bread, etc. The first week is tough. Being a sugar lover, I discovered that my cravings were much more psychological and habitual than physical. I'm bored, I eat. I'm happy, I eat. I'm stressed, I eat. You get the point. In the afternoon, you find something sweet as a treat. After dinner, who doesn't want a treat? These habits were not due to needing or even wanting the food in question. They were much more based on what I had always done. The thing I noticed is that after embracing the new diet, there is a huge sense of power and freedom in choosing what I would eat. I remember the first time someone at work offered me a cupcake from the inevitable box of deliciousness that was left by a vendor and I simply said, "No thanks". I was amazed afterward at how easy it was. I didn't miss it. I didn't need it. And keeping my commitment to myself gave me power.

So what was the effect? I stopped having energy crashes throughout the day. No more fighting to keep my eyes open at my desk at 10:30 am and no more afternoon carb overloads after lunch. I would wake up, head to the gym and maintain a high energy level from morning until bedtime. I lost about 20 pounds. The weight loss wasn't hard or painful and my workouts were fairly simple; walking and occasional weight lifting. And, as you may have experienced, when you improve one area of your life, other areas are affected. Keeping your commitment to yourself creates self-confidence and I felt great!

Being someone who loves to cook, I was concerned that I wouldn't be able to make anything fun anymore or anything delicious to others. While Roland gets excited about a big slab of steak on a plate, it doesn't do a whole lot for me. I soon discovered that there were countless blogs and even cookbooks with Primal and Paleo recipes. You can use cauliflower in place of rice, spaghetti squash in place of pasta, almond flour in place of white flour, honey in place of sugar, etc. This was a fun and new challenge for my skills in the kitchen.

After about a year, we got a little lazy. Our meals at home were still Primal, but we found ourselves eating out more and allowing too many "cheats". It was too easy to just grab a burger and fries when we hadn't planned ahead. The snowball took effect and we veered back to a mostly conventional diet. The pounds inevitably returned, and naturally brought a few friends with them.

So March 1st we re-committed to 30 days of eating Primally. While you can get strict on this, to us this meant no grains, no sugar. Today is day 35 for me. I feel great! I am down 4 pounds in a month and Roland is down 5. While it is less than I was hoping for, I realize my body is having to fight through all the crap I fed it. If your body doesn't believe you (say, because you have "dieted" for the last 20 years) it tends to hold on to its storage. Over time, the compound effect will take place and the results will speed up. I have no doubt.

More importantly, I kept my promise. I followed through on my commitment and took back my power over the foods that, in all honesty, have dictated my choices for years. Keeping your promises builds confidence and that allows you to make more and bigger promises. I have revived my schedule of getting up at 5:00 am and heading to the gym. I am planning on participating in a couple of 5Ks this summer, even if I am the last to cross the finish line. I have recommitted to this blog, which has been depressingly neglected. I am making efforts toward finishing books that are gathering dust on my nightstand and nurturing friendships with people who may not even remember my name at this point. Growth takes effort. But not as much as you'd think.

Just make one promise. Then keep it. Grok on!

Thursday, February 7, 2013

Oh How I Love Thee. Let Me Count the Ways…


A few years back for Valentine’s Day I made a list of 100 things I loved about Roland. At the time it was an affordable gift and he seemed to really appreciate the kudos. I recently came across the document on my computer and re-read my list. It was interesting to me how quickly it sparked a strong emotion of love and affection for my partner, even just in the middle of a Thursday morning. Similarly, Roland has expressed to me that there have been days when he re-read the list and it makes him feel great to be reminded of so many of his great qualities and the appreciation I have for him.

We have used this as example and suggestion to others close to us as a way to get back in touch in their relationships. Though it seems simple, I wanted to offer this as a suggestion to others. Make a list of the things you love about your partner. What makes you feel good? What makes you laugh? What makes you smile? What do you miss the most when they are not around? What are you grateful for? You can choose to share this list with them, as I did, or it may be more appropriate to keep it to yourself. But understand the power of words. Just the act of making this list will create emotion in you and remind you of your blessings and the things you appreciate about each other. It only takes a few minutes and you will be surprised how quickly you can come up with 100 things. It is a great exercise to complete and I believe gives a positive result every time.

Regardless of your current situation, you will benefit from this process. If you are happy and madly in love, this will communicate those feelings to your significant other. If you are struggling in your relationship and feel frustrated or angry, this will draw your attention back to the positive things and the reasons you fell in love in the first place. Or, if you are simply in a lull or rut, as we all find ourselves occasionally, this is a great way to keep yourself from falling into complacency as day to day life can sometimes feel redundant. 

Our primary relationship is a huge part of our lives. It is essential that we keep it at the top of the priority list and nurture it regularly. This is just one way I have found to make sure I am focused on the blessings in my life and communicating those as well. Take a few minutes to do this, just because, for no specific occasion or reason. Or, use this as part of a Valentine’s gift. Revisit your list regularly. You will be surprised how grateful it will make you feel and how great it will make your partner feel. 

What is the best Valentine’s gift you have ever given?

Thursday, January 24, 2013

Primal Elk Chili

Roland came home one day and announced that we were buying 1/3 of an elk. As a girl raised in a non-hunting family, I was excited for the new experience, but a little intimidated by the prospect of what to do with elk meat. So, I have been on the hunt (pun intended) for new recipes and uses for our freezer full of elk. Some have been terrible, others acceptable, but this one turned out delicious. Which is a good thing since I made enough to feed us for 4 nights in a row. I'm sure somewhere, Martha Stewart is cringing.

I adapted this recipe from one I found over at Civilized Caveman. Check out his site. He's got some great recipes.

Primal Elk Chili
2 lbs ground elk meat
4 medium zucchini, peeled and chopped
2 green bell peppers, chopped
2 yellow bell peppers, chopped
1 large onion, chopped
1 (14.5 ounce) can tomato sauce
2 (14.5 ounce) cans fire-roasted diced tomatoes
3 T chili powder
1 T cumin
1 T garlic salt
2 t cayenne
2 t oregano
2 t black pepper
2 cinnamon sticks
3 T butter

In large stock pot, melt butter over medium heat. Add chopped onions and saute for about 10 minutes. Add in zucchini and peppers and continue to saute for another 5 minutes. Add elk meat and all spices and mix well. Continue to cook, stirring often, until meat is no longer pink, approx 10 minutes.


Add in tomato sauce and diced tomatoes and whole cinnamon sticks and stir to combine well. Reduce heat to low, cover and simmer for 45 minutes. Remove cinnamon sticks and serve hot with shredded cheese if desired.


Tuesday, January 1, 2013

Homemade Eggnog


This is a delicious recipe perfect for your winter parties and celebrations. We made a batch for New Year's Eve and invited friends to stop by for a glass before heading out to their various get togethers. It is smooth and mild, which is my preference. You could easily make it stronger if that is your taste. Or, if you prefer a non-alcoholic version, just leave out the rum. This makes a great tasting eggnog either way.

Homemade Eggnog
4 cups milk
5 cloves (whole)
2 1/2 tsp vanilla, divided
1 tsp cinnamon
12 egg yolks
1 1/2 cups sugar
2 cups light rum
4 cups half and half (or cream)
1/2 tsp nutmeg

In a saucepan over low heat, combine milk, cloves and 1/2 tsp vanilla. Heat on lowest setting for 5 minutes. Increase heat to medium-low and slowly bring mixture to a boil.

In large bowl, combine egg yolks and sugar. Whisk until smooth and creamy. Slowly whisk hot milk mixture into egg mixture. Return new combined mixture back to saucepan. Cook over medium heat for 3 minutes, stirring constantly. Do not allow to boil. Strain to remove whole cloves and allow to cool for 1 hour.

Stir in rum, half & half, remaining 2 teaspoons of vanilla and nutmeg. Refrigerate at least 6 hours (or overnight) before serving.

Traditions


At this time of year we tend to focus on traditions; those we continue and those we hope to put in place. What are your traditions?

I believe traditions are essential in our lives. They create a foundation for our values and also provide a way for us to connect with those we love and create memories for future generations. In a way, our traditions are what keep us connected to loved ones that came before us and those that will come after. Everyone wants leadership. Often, the person willing to uphold the tradition will serve as that leader. Knowing that certain activities and gatherings will happen each year provides a sort of comfort and certainty for our families and friends. I have found that even traditions that seem "silly" are held as important to those involved. While you might expect people to grow out of some traditions, they often look forward to the event and find ways to involve their children or growing families.

Growing up, my family's traditions around Christmas are many of my best memories. My mom made sure to be consistent in activities and even foods that are now an integral part of what I consider "the Holidays". She always made sugar cookies which the kids would decorate together. After we grew older, we still would come together as teenagers to ice the sugar cookies (though our designs became less child-like and more competitive). After moving out of the house, this tradition faded and I found that I missed it. A few years ago I decided to revive this tradition in my own home. Not having kids, it seemed a little unnecessary, but I determined that if the activity and memory make me feel good, it is worth doing. I invited my step-daughters and siblings over to participate. Some years they came, other times they didn't. This year, I convinced myself that I was the only one interested in continuing the sugar cookie tradition, so I planned to just do it alone. I was surprised to have a couple of people ask me about it and whether or not I was hosting it again this year. This goes back to my point that people feel good being involved in traditions. They may not go out of their way to plan it, they may not be as attached as you are, but if the opportunity is presented to participate in familiar family-oriented activities, they will jump at the chance.

In our home, Roland and I have made it a point to create and continue traditions. It is easy to get discouraged when others choose not to participate sometimes, but over the years we have learned that if you provide the consistency, they will always come back. Our families know that we are the same yesterday, today and tomorrow. While their lives take them out on many paths full of excitement and stress, eventually we all seek out that familiar comforting place we fill with traditions.

So, what are your traditions? I love looking for new ones to share with my family or maybe even good ideas to expand on some of our existing ones. A few of ours include:

  • Corned Beef and Cabbage Dinner on St Patrick's Day. We recently turned this into a dinner party to invite friends over for the evening.
  • Lamb Dinner on Easter. Our families always join us for a lamb roast and mint jelly.
  • 4th of July Parade. We meet up at about 4:00 am to go stake out a spot at the local parade. We always stop for Krispy Kreme donuts and then follow it up with a BBQ.
  • Thanksgiving Scavenger Hunt. This was a new one for us this year (thanks to Roland's sister for the idea!) but it was a lot of fun and I think we will continue this in years to come. We handed out a scavenger hunt list a few weeks prior to Thanksgiving and invited everyone to collect their items and bring them to Thanksgiving dinner where the winner would receive a prize. The competition was fun and it created an opportunity for family members to work together to help their team win.
  • Sugar Cookies at Christmas. I love to make my mother's recipe and invite the family over to help decorate and take home a plate of treats.
  • Homemade Ornament Exchange. Roland's mother and sister started an ornament exchange a few years ago. They were nice enough to let me join in. Each year the women make a homemade ornament for each of the others and we exchange. The photo at the top of this post was the ornament I made this year.
So, what are your favorite traditions? Do you think tradition plays an important role in your home?

Saturday, December 29, 2012

The Newest Member of Our Household!

No, we did not have a baby. And no, we did not get another dog. Although Roland makes fun of me because every time I see a Humane Society commercial I get emotional and am convinced I must adopt every hungry and/or neglected puppy.


Today my Christmas gift from my honey arrived! A brand new, smooth ceramic surface range/oven. I am excited to say the least. Our old range (may that terrible beast rest in peace) had many issues. If you have ever cooked on a stove with a short in the burner, you can sympathize. Mid-cooking your pan goes cold and you realize the burner has stopped working. Take the pan off the stove, use a hot pad to push the burner into the socket and hope a fresh connection is made before you lose the momentum of whatever you were cooking. Then there was the bottom drawer, where you store the pans. The thing never sat on the rails right so it was always crooked and made a racket anytime you opened it. 1st world problems? Of course. But for someone who loves to cook, this was enough for my sweetheart to take pity on me and surprise me with this beauty on Christmas morning!

Many recipes will be shared. Many hours will be spent cuddling. Okay, maybe not actually cuddling, but I do have a slight crush on this machine. It makes me want to dress up like Donna Reed. Who wants some celebratory cookies?

Sunday, September 30, 2012

Roasted Cabbage

I am always looking for easy and tasty vegetable options, because, let's face it, you can only eat steamed broccoli so many times. This is a great way to prepare cabbage. It is easy and always gets a great response from the dinner guests. I used this preparation for our St Patrick's Day dinner party also, since it seems like crock pot cabbage always turns out soggy and flavorless. Give this one a try along side your favorite meat dish. I recently served this with a dry-rub seasoned flank steak and it was a delicious meal!

Roasted Cabbage
1 large head green cabbage
olive oil
salt and pepper

Preheat oven to 450 degrees. Spray a baking sheet or roasting pan with non-stick spray. Wash outside of cabbage head. Cut head in half (through the core) and then cut each half in half twice more, leaving you with 8 wedges. Arrange wedges on baking sheet and brush each wedge with a little olive oil. Flip wedges and repeat on other side. Sprinkle with salt and pepper.


Roast in oven for 15 minutes. Carefully flip each wedge and roast for anther 15 minutes. Enjoy!


Wednesday, August 1, 2012

Scotch Eggs

Scotch eggs are delicious! If you haven't tried one before, you will love this recipe. Traditionally, scotch eggs are rolled in bread crumbs and fried. They are a common "pub" food in Britain and often eaten cold. I've never tried that version, but this Primal grain-free version is awesome and has become a favorite breakfast at our house. It is great to eat hot and fresh, but also easy to pack up and reheat later if you need breakfast on the go. I usually make enough for a couple of days as the leftovers taste just as good.

Scotch Eggs
1 lb hot Italian sausage
5 hard boiled eggs, shelled
3/4 cup almond flour


Preheat oven to 350 degrees. Line a baking sheet with foil and spray with non-stick spray. Divide the sausage into 5 equal parts. (I have noticed at some stores it is cheaper to buy Italian sausage links than the ground sausage. They are usually by the bratwurst in the meat section. This is great because the meat is already divided for you. Just remove the casings and you are ready to go.) Flatten 1 portion of sausage in your palm like a patty. Place an egg in the middle of the sausage and use your hands to mold the sausage around the egg, making sure to seal the meat completely around the egg. Repeat with all 5 eggs. Roll each sausage ball in almond flour and set on foil-lined baking sheet.

Bake the eggs until the outside is browned and the sausage is cooked through, about 25 minutes. Remove from oven and allow eggs to rest for 5 minutes. Once ready to serve, cute each egg in half and serve plain or with hot sauce or mustard.

Sunday, July 29, 2012

"Spaghetti"

Spaghetti has always been a favorite meal at our house. But since we have given up grains in our diet, I thought we would have to give up this meal as well. Luckily, I found an easy and healthy substitution....spaghetti squash! Roland was hesitant the first time I made this. He really did not want me messing with the spaghetti recipe he loves, but after tasting it, he was sold. We love this recipe and I use it often for dinner at our house. Hope you enjoy it too!

Primal "Spaghetti"
1 medium (or 2 small) spaghetti squash (I usually can get about 6 servings from a medium squash)
olive oil
salt and pepper
1 lb ground hot Italian sausage
1 small onion, chopped
2 cloves garlic, minced
1 jar of your favorite spaghetti sauce (or use the recipe below to make a homemade sauce)

Tomato Basil Sauce
1 can (28 oz) tomato sauce
1 large avocado
Handful of fresh basil leaves (or use dried if necessary)
garlic powder, to taste

To make homemade sauce, combine 4 above ingredients in blender and blend until smooth, adding a little water if sauce is too thick.


Preheat oven to 350 degrees. Cut your spaghetti squash in half lengthwise. Use a metal spoon to scoop out all the seeds and stringy center (like you would on a pumpkin). Rub a small amount of olive oil on the exposed squash in each half and sprinkle with salt and pepper.


Turn squash halves face down in a roasting pan. Add about 1/4 inch of water to pan. Cover pan with foil and bake for 40 minutes.


While the squash is roasting, combine Italian sausage, onion and minced garlic in a large sauce pan.


Cook over medium high heat until sausage is browned and cooked through. Add spaghetti sauce to meet mixture, reduce heat to low and simmer until squash is done roasting.

Once squash is ready, remove foil, and turn squash halves face-up. Using 1 fork to hold the squash in place, use a 2nd fork to scrape from the edges toward the center of squash. The "meat" of the squash should easily shred into "noodles".

Serve "noodles" topped with meat sauce (and a little fresh grated Parmesan) along with a green salad and you are all set!